1. For the Love of Fonts: use a lot of fonts in short words or phrases.
 For this card I found how to spell "love" in a bunch of languages. You could also use adjectives to describe your loved one in a card like this.
I picked a different font for each language (SNF has a lot of fonts with international characters, all the Premium Fonts and many Standard Fonts), and puzzled them together on a card. I liked how it looked with boxes around each word, but it can be done collage style, too, without the boxes. If you have certain words that are more important than others, make them larger (like I did with "LOVE"). Tip: to fill in holes, add DoodleBats.
To see all the fonts I used in this card, go here.
2. Take fonts to the heart: Type your fonts within a shape or larger letters with the help of Photoshop.
 Last Spring, Brian Tippetts gave us another example of this fun way to use fonts, and he included two free Photoshop template downloads to help you.
If you're using Photoshop, it's not hard to create this look on your own! I use Photoshop CS3, but the method is the same for a lot of versions of Photoshop.
First, Type the letters or DoodleBat you want. Pick a thick, simple font (like LD Mon Cherie or LD Modern Slab), or a solid simple DoodleBat image, and scale it BIG. I used the number 0 in DB Sweet Spring for the butterfly below.
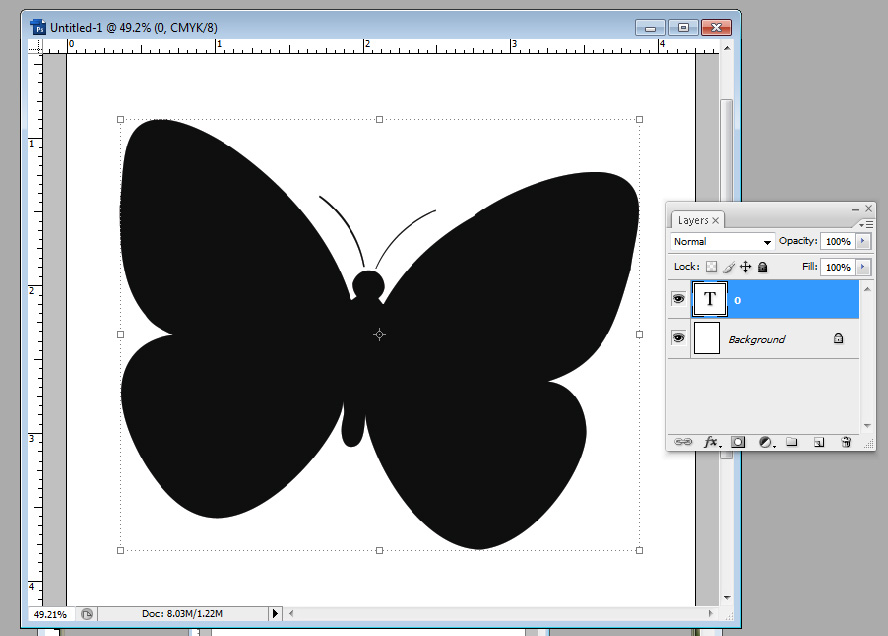 Notice the layers window shows my butterfly as a text layer. For the next step, while your text layer is selected, go to the top menu bar for Layer > Type > Convert to Shape. When you click that, your layers window will look like this:
 And your DoodleBat/letter will have a line around it, meaning it's selected and it's changed into a shape.
If your shape does not have a line around it, look at your layers window. The layer with the shape should have two parts, the first is a colored square and the second is a square with your shape in it. There is a little chain link between the two.
 The shape square should have a double line around it. If it does, you're good for the next step. If it doesn't, click the shape square once and that should select the shape. It is important for the shape to be selected for the next step.
Next we select our type tool. Hover the cursor over your selected shape and the cursor should look different. It should have a dotted circle around it.
 Make sure not to hover the cursor on the edge of the shape or you'll get a different cursor with a diagonal line through it. This cursor will allow you to type on the outside edge of your shape, which is a good tool, but not what we're trying to do here. Here are the two different cursors.
 We want the cursor pictured on the left. Click the mouse when you see this cursor, and you can start typing in your shape. Make sure to make your font size smaller and use a font that looks good inside your shape. You may have to play with font size and paragraph alignment to get a look you like. For this card, I used LD Jambalaya.
 Notice you now have a shape layer and a text layer. If you want to make your shape layer invisible, just click on the little eye next to the layer in the Layers window. The text layer will still type in your shape.
 Finally, fit it into your layout, and you're done! Easier than you thought, eh? And totally cool.
3. Build a foundation of Love: Use blocks of text as a background element.
 My husband and I have always loved the song "I Will" by the Beatles. By layering the words to that song subtly in the background of this card using LD Abe Lincoln, it introduces another layer of sentiment. The bird is from DB Sweet Spring and the brown font is LD Remington Portable.
 This example uses a block of text as the ground layer for the eskimos. It's not the primary focus, but another fun way to add text and sentiment. The text is LD Advertise This and the eskimos are from DB Eskimo Kisses.
I hope you can use these ideas to make awesome Valentine's Day cards and future projects! Happy Fonting!
Shop ScrapNfonts.com for the widest variety of craft and scrapbooking fonts, DoodleBats, WordArt and Brushes.

9 comments:
For the butterfly shape, is it possible to do this in Photo Shop Element?
I tried with PSE and could not do it :(
Thank you for the Tuto!, it's really nice!
I'm in love for the newest proyect!!!
Claudell
wow that was so easy. thanks for the tutorial.
Great ideas! I can't wait to try them. Thank you!
Love your ideas! I can't wait to try this idea out for my husband's Valentine's card.
I enjoy following your blog and have given you an award for all the great ideas you share. Check out my blog for more information. http://therobbsbloggingalong.blogspot.com/2011/01/blog-award.html
i have always been in love with fonts sence getting the good penmemship awards in 3rd thru 6th grades.Now I love using my computer to enhance my cards and I love this idea what a great new way to usemy fonts!!! thank you!!
I REALLY wanted to make the LOVE card for my husband for our anniversary, but alas it isn't meant to be. I've tried following your instructions in both Photoshop Elements 6.0 and Photoshop 7 and I can't get the text to go into the shape. I even tried switching to a shape rather than letters and that didn't work. I can't get the text curser to become an I with brackets around it. It is always an "I" with a square around it and creates a new text layer that just writes overtop of the shape. Any suggestions?
Thanks,
Kim
It's been a long time since you wrote a blog post- I hope you havent abandoned it. I found so much inspiration in the cards you showcased, and I would sure like to see some St. Patrick's Day ideas for cards .... Maybe we should have a Facebook/Flickr contest,what does everyone think?
Post a Comment