 Answer: Potential! Imagine the possibilities! This jar is just itching to be filled with treats, whether they are for you or to give away. You know what else it's itching for? To be beautifully presented, and that's where I come in.
I have recently discovered the versatility of mason jars and am so excited! They are a fabulous, cost-effective way to create beautiful gifts for the holidays, favors, or just because. Of course, if you can your own jams, sauces or soups, those also can be beautified with a homemade label by you.
After filling my jar, I started with this:
 Full sheet sticker paper. They are camouflaged as "shipping labels" but don't let that fool you. They travel through my printer perfectly and I can squeeze at least four jars worth of labels per page if I puzzle them together.
 My treat of choice is homemade tomato sauce. Mmmmm. Just thinking about it makes my mouth water and fills me with a happy warm feeling of home comfort. I carefully cut out the printed labels.
 Then I peel the paper off the back of the sticker and carefully place them on my jars. Most of my stickers had a handy diagonal cut through the paper on the back of the stickers so it was pretty easy to get the stickers off. Some stickers needed a little coercion, but they came with a little help.
 Here is my final shiny happy jar of tomato sauce. Isn't it lovely?
 I created the label using LD Petticoat Black for the title, LD Antique for the script at the top and bottom of the label, and DB Cookout and DB Fleuries for the little tomato decoration. For the gold frame shape I actually used the letter L from DB Chill Out and erased the words in the middle.
Here is my final army of tomato sauce jars. They look pretty impressive all together like that!
 But don't think you have to make your own tomato sauce to make cute labels! Here is a jar of "medicine" to make someone feel better on a blue day. Just add candy! Easy, huh? But totally cute.
 This label uses DB Floral Infusion for the white flower, LD Remington Portable for the main text on the label (I thought it gave it a nice old prescription bottle look) and SNF Uptown for some little details (i.e. itta britta apothecary).
Have you ever seen those cookie recipes in a jar? They are so much fun to give and receive.
 I got the recipe for these cookies here. I made this label using mostly DB Karma Borders - I L.O.V.E. this DoodleBat - and for the words I used SNF Duluth Block, SNF Party Script and Party Script Bold. I used the same fonts on the back where I included the directions to finish off the recipe.
Are you totally psyched to make a mason jar project now?
Yes?
Want some help starting out?
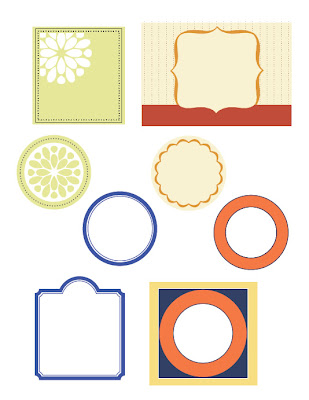
Good. I can offer help... it's a free download! Hurray! There are four labels on this pdf, including round labels for the lid. Pick your own fonts from scrapNfonts to complete the details. (You can click on the image to download the pdf.)
 Happy canning! and labeling! and gift giving!
****UPDATE****
Since many of you requested some direction on how to add fonts to the labels I will add a few pointers here. First of all, if you are familiar with a graphic program that uses layers, such as Photoshop, Photoshop Elements, Fireworks, etc, that would be best. You can type on a different layer from the labels and move the type around, change the font, etc, until you get what you want.
If you do not have Photoshop, fear not! This is still a project you can do, you just have to be more patient. If you have Windows chances are you have "Paint." Open up the pdf in Paint and select the type tool (It looks like the letter A in a box). Once you start typing you must do all the editing you will want (font color, size, location, etc) on that particular type box before you do anything else. You can move the type box around while it's selected if you hover the cursor over the edges/corners. When you get an arrow with four heads, click and drag to move the box. The arrow with two heads will resize the type box. Once that type box isn't selected anymore, you can't change it. If you happen to de-select the type box and you don't like how it looks, just hit Ctrl+Z and it will undo whatever you most recently did. You can save and print from Paint, too. Good Luck!
Shop ScrapNfonts.com for the widest variety of craft and scrapbooking fonts, DoodleBats, WordArt and Brushes.
