 Tempting, huh? Wanna see what's in it? Wanna learn how to make it? Read on!
First of all, I have a confession. I don't have a cutting machine, but I would love one. I drool over projects in the idea gallery by Regina Easter, who is amazing with personal cutting machines. As a result of this absence in my crafting life, I make due with things I have hanging around. My husband has called me the MacGyver of crafting because I resort to some weird, weird stuff.
Lately I've been really in to circles. A nice crisp clean circle is charming on a card, perfect for kids crafts and necessary for some fabric crafts. Where do I go for my circle tools galore? Why, the kitchen, of course!
 Look at all those circles, just waiting to be used and outlined. I think one of my primary go-to circles is the lid of my peanut butter jar. That size circle works for dozens of projects! Of course, I first double check to make sure there's no peanut butter on the lid.
For today's occasion, I have printed out an image for a birthday card. The image is the letter "a" from DB Party Animals scaled up to around 200 point font size. After examining my toolbox, I discovered that the lid to my peanuts is perfect.
 Next I need a slightly larger lid for a paper mat. A little more kitchen wandering, and there it is! It's the lid of my sugar canister. Perfect.
 Gently outline with a pencil (keeping the pencil at a 45 degree angle all the way around the edge)....
carefully cut exactly on my drawn circle...
and voila! Two perfect circles.
 And a little while later... a finished card! Yay! I found a nice font to compliment my image in Scrap Round.
 But I'm not done with my circles yet. I need to make that cute little envelope wrapped up like a present to hide this darling little elephant. That means, back to my circle toolbox! I need to find a circle that is just slightly taller than the entire card.
There it is. Thank you, Mr. Quaker.
 Trace and cut out four circles of the same size.
 Fold each paper circle exactly in half. Fold crisply.
 Arrange the folds together in a square, carefully overlapping each circle under and over the circles next to it.
 Without too much moving around, squeeze a little glue under each overlap. Before the glue is dry, make sure to bring the circles tightly together in the middle, so there's no hole in the middle.
 Here is your envelope. Gosh darn, this is so cute you could make this into the card itself! Just slap a pretty square piece of paper right in the middle with your message.
 But not today, not for me. I have a charming, playful little elephant who wants a home. In he goes!
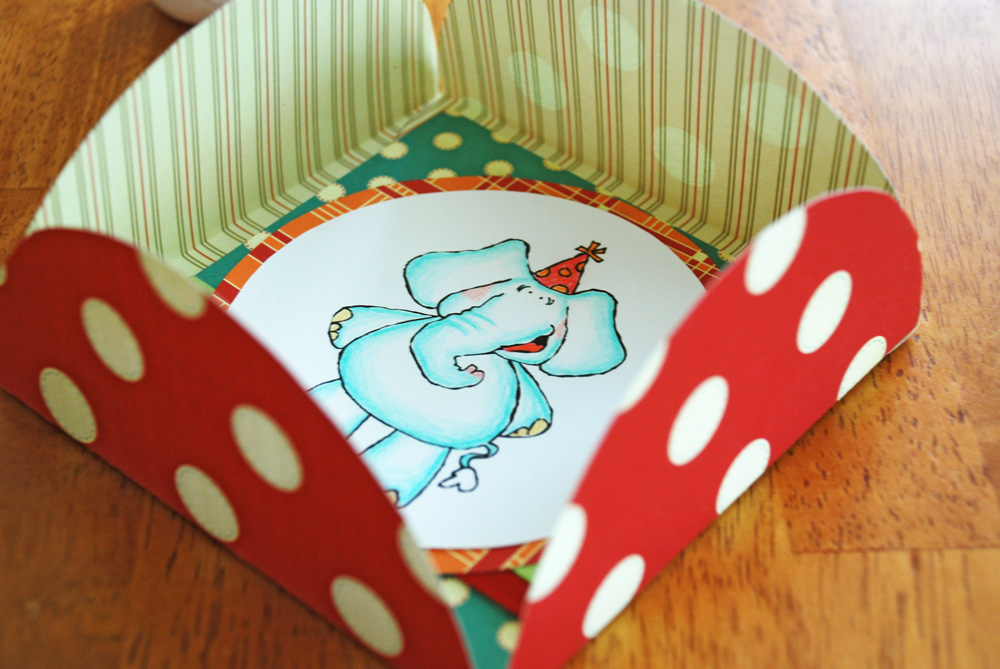 Carefully fold each flap down, tucking the last one in so each flap overlaps the one next to it.
 Here is my completed envelope:
 Now for the final fun touch! A ribbon wrapped around the whole kit-n-caboodle.
 And there it is! There is your circular gift, just waiting to be given away. I promise it will bring a smile to the lucky recipient. Happy crafting!
If you like the hand-drawn image I used of the elephant with the party hat, you should hop and skip over to scrapNfonts and check out other hand drawn doodlebats. There are tons to choose from! I used paper from Cosmo Cricket's Lil Man collection.
Shop ScrapNfonts.com for the widest variety of craft and scrapbooking fonts, DoodleBats, WordArt and Brushes.

64 comments:
Really clever idea for an envelope and so cute too, TFS
Margie
This is absolutely adorable what a clever use of objects around the home too...I love that! Sweet hugs, Bonnie xx
absolute cuteness. i can't wait to make a card and envelope!!
You are so very clever. I have a kitchen full of gadgets, but spend my money on craft machines. Now who is the smartest? :) Thank you so much for the ideas.
Never again will I complain about not having the fancy gadgets for croping! My pantry has a plethora of things to use. Thanks for the great ideas!
Your post is too funny. The McGyver of crafting. I love it. I have cutting dies and a cutting system and I still go to my kitchen for ones I need. I'm gonna make this envelope. Thank you for this wonderful tutorial.
Cute!
Sandra
What a cute card...you're so clever. Thanks for sharing with us.
Carolyn
Cute card and envelope - I used to trace and cut circles, but now I fortunately have the Making Memories Circle cutter - which I love and is so easy to use!
I love the circle envelope idea! I trace circles with household stuff all of the time too!
oh this is totally totally fabulous...hugs
This is so cute! Talk about using your resources! You are brilliant!!
Very nice. Thanks for sharing. We often have gift cards or small things that we don't like just sticking in an envelope. But buying a small box to put them in seems wasteful. I can get decorative card stock from the dollar store for this.
Very cute...and so nicely done.
At the risk of sounding flippant....a compass would eliminate hunting for anything. =)
It's as if people forget they exist.
This is such a cute creation!
The card is lovely, but it was the envelope that really did it for me! It's so easy and it looks great!
http://duzentasideias.blogspot.com/
I don't understand, it seems comments are leaning towards excitement over circles. Did no one take a math class throughout high-school. Use a protractor and a ruler, game over, the things look nice and all but come on.
Very cute. Great choice of paper for the demo too.
You can also make any size circles, using two pencils and a rigid string. For more stability, tie the pencils together with two strings so they don't wobble.
I stumbled upon article on how to make a cute envelope, and what was supposed to be an already grotesquely adorable mix CD turned into a little love monster. And it ate my face. I hope my boyfriend appreciates my scrapping :) THANK YOU!
Love it!
Super cute! Will surely have to try this myself! Thanks.
This is very cute! Nice job!
You don't have to buy an expensive machine to cut circles, though. I have the Creative Memories circle (and oval) templates and they work great!(Don't work for them, just use them). I just can't cut nice circles by hand! ;-)
I'll never look at my jar lids the same way again ! ;) Thanks for this great post, really enjoyed it !
so cute, thanks for sharing!
Wicked cute. Love this card/envelope project. Gotta try it. Thanks for sharing directions.
So simple yet elegant. I love it. Thanks for posting.
I Stumbled this and loved it! I was just wondering what weight of paper you found to work best for this?
this is awesome! You've earned yourself a new follower!! Can't wait to make some circle envelopes, yahoo!!
https://jennoreilly.wordpress.com/
Very clever and yet so simple! I am totally using these ideas to make some unique invitations for the next party I host. Thank you!!
Use a can instead of a lid. Heavier, and it won't give!
That is fabulous! Love it!
Very cute idea, love it...
Soo Cute!
Thanks for sharing! So cute. Love Michelle
Very cute and clever! Thanks!
Coco
Nice one! I like the colours and patterns that you have chosen.
fantastic!! I love that you don't use a fancy tool!!
kisses
heather
This is great. It could be perfect for a wedding invitation!
What a darling and easy tutorial! So cute.
I love this idea! After seeing this, I dropped what I was doing and made several!
What an awesome idea! As a print designer, I'm so used to thinking in terms of single sheet being die cut, but I love that this didn't neet any fancy tools. Thanks for sharing.
Thank you for shearing.I will try it!
Cute idea. Gotta remember that one for the next kids Bday
Inspiring. I sawy your blog in the a.m. and by the afternoon I had made something(I must say)clever and round and gave it to my neighbor when I returned her book. Thank you so much!
Lovely Idea
So clever! Thanks!
Cute & Clever! Your work is beautiful. Thanks for sharing.
WOW.... it is simple and beautiful.. i just love packing gifts in diff styles.. thank you for sharing.
Oh my gosh, those are super cute. What a great idea.
Stumbled Upon your site. Going to make some of these... I know they will make little gifts seem all the more special.
what a sweet idea! Looks lovely, might have to try that sometime.
Can't wait to try this !
Really adorable!!! You tutorial was very thorough and detailed! Can't wait to make these cards, Thank you!
These is amazing, simple and funny craft i ever seen :)
Thank you for sharing
This is GREAT! I'm using it for a gift card holder too! LOVE IT!!
Absolutely brilliant! Simple yet clever. I'm linking back to you from my new blog, rachelrobinsnest.com. Keep up the great work!
There is no need for a cutting machine if you can learn how to trace printouts with an exacto knife.
You can use a protractor. That way you can measure your circles if you want your backing to be a certain size bigger(ie. if you want there to be a 1/4" border, etc.) Much easier than trying to find things in your pantry that are the perfect size...
I just linked back to you from my very tiny blog, rachelrobinsnest.com. Thanks for the lovely idea!!
This is an amazingly fun idea! Thanks so much! I have a birthday this weekend and was starting to freak you saved me!
You are incredible! I can't wait to try to make this card! I have lots of paper that I can see using for this project. Thx for sharing!
Love,
Softa
How clever, and what a great way to be creative and save money too... thanks.
Adorable! Pinterest says your site isn't pinnable. You might want to fix that :) I also found your content stolen and on another site but I can't figure out how to contact you to tell you which site. Adorable ideas! You should be getting credit for them :)
Sooooo cute. I have shared your link on Freebies for Crafters. Thanks for sharing. Hugs Khris
Post a Comment